backing up and restoring bootable linux sd cards
Probelm
I created a ubuntu server SD card for the PI, wrote some code to do stuff! Now I want to back that up efficently for resuse as a fallback or make some copies for easy replication.
I can create a 1:1 block copy using the linux dd command. however it replicates the phycical card. It’s not straightforward if I want to shrink it to a smaller SD card for example.
There are ways to solve this from creating a kernel patch to using a dockerfile however below is a dirty low effort way.
This solution was performed in ubuntu linux.
Method 1
I need to find how linux identifies my SD card.
- Put the SD card to a reader and insert to linux
-
Find out target device enumeration 2.1. use the gnome-disks utility to find out where the disk is
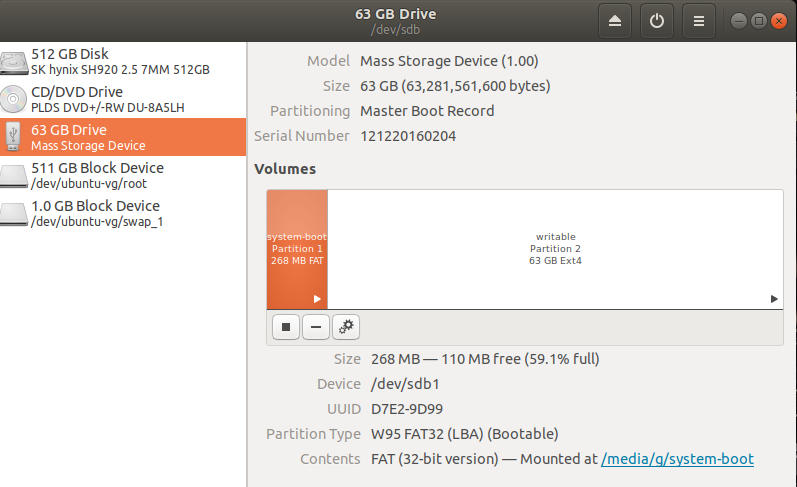
Here you can see my SD card is at
/dev/sdb(this is split into system-boot sdb1 and writable, sdb2 however the device is sdb)2.2. Alternatively you can use lsblk to list the block devices and find out. Also note that we need to unmount the device for
dd(in the next step) - Unmount the device (if mounted)
- use umount
/dev/sdb1andumount /dev/sdb2
- use umount
- Create a copy of the whole SD card (after unmounting all the partitions mentioned in step 3)
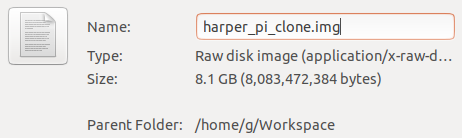
Here I’m using the dd command.(my target device is /dev/sdb my destination is /home/g/Workspace/harper_pi_clone.img)
Command:
sudo dd if=/dev/sdb of=/home/g/Workspace/harper_pi_clone.img status=progress

- Shrinking the image
As you may see, my SD card is quite large and I’m barely using any of the storage. To make the process efficent I need to shrink my image. (in the future I can use smaller SD cards or share my image over a low bandwidth internet connection easily).
for this step we will use GNOME Partition Editor with fdisk to manipulate the disk partition table and truncate to resize (shrink or extend) the size of a FILE.
Some context: GParted works on phycical devices such as hard disks, or memory cards wo we have the option to do it in the SD card itself (in my case /dev/sdb) prior to dd. but in this case I did’t want to touch the original just in case.
Now after runnning dd in step 4, we have an .img file (harper_pi_clone.img). To use GParted on this we now to convince GParted that this is actually a device. So now we set off to create a loopback device.
5.1.
Enable loop driver. sudo modprobe loop
    Set up a new loop device (associate a loop device with regular files or block devices)
    ```
    Sudo losetup -f
    # my ouptout was `/dev/loop16`
    ```

    Create a device from the image we made earlier with `dd`
    ```
    sudo losetup /dev/loop16 harper_pi_clone.img
    ```

    Now /dev/loop16 represents harper_pi_clone.img, loop16p1 and loop16p2 represents the two partitions (system-boot and writable as I mentioned earlier)
5.2 Load the new device using GParted! Now let’s use the loop device with GParted (install gparted with sudo apt install gparted if you don’t have it already)
Invoking gparted  GUI
GUI 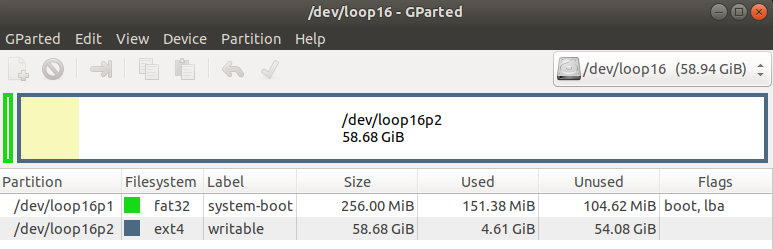
Now you can follow through the resize the non system-boot partition.
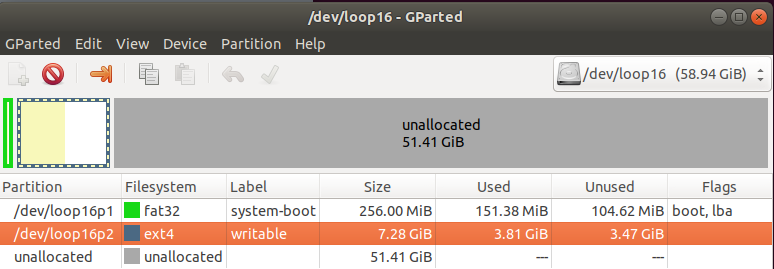
After suceesing you many notice that there some unallocated space in the drive. From the device perspective this part of the device will not be used. however we have an image pretending to be a disk. Now we need to use a different tool to shrink the image.
to wrap up relese the loop device
sudo losetup -d /dev/loop16
- Trimming the unallocated space out
First we need to know where our designated partition ends and the unallocated space begins.
fdisk -l harper_pi_clone.img
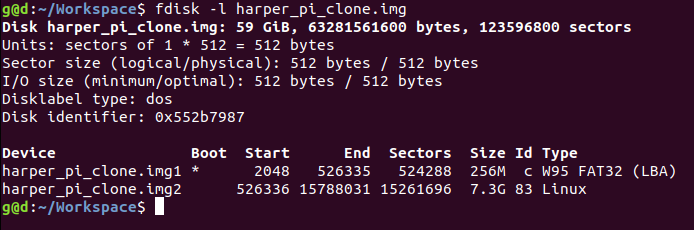
Disk harper_pi_clone.img: 59 GiB, 63281561600 bytes, 123596800 sectors
Units: sectors of 1 * 512 = 512 bytes
Sector size (logical/physical): 512 bytes / 512 bytes
I/O size (minimum/optimal): 512 bytes / 512 bytes
Disklabel type: dos
Disk identifier: 0x552b7987

Device               Boot  Start      End  Sectors  Size Id Type
harper_pi_clone.img1 *      2048   526335   524288  256M  c W95 FAT32 (LBA)
harper_pi_clone.img2      526336 15788031 15261696  7.3G 83 Linux
You can see that the second partition ends at sector 15788031 </br> a sector is 512 bytes (units: sectors of 512 bytes)
This means at that the unalllocated apace begins after sector 15788031 (byte (15788031+1) x 512)
Note: Sectors are zero indexed so for the count we use (sector_id + 1) x sector_size_in_bytes
Armed with this information now we can shrink the image!
let’s use truncate to shrink the image.
truncate --size=$[(15788031+1)*512] harper_pi_clone.img
Note: We were able to use the trimmed image sucessfully to shrink a ubuntu server os from a 64Gb drive to less than 8Gb! However we had to use fsck to repair the filesystem on first boot (booted into safe mode in the first run). This was relatively easy!
- use a program like etcher to flash the image.
Method 2:
This is quite similar to method 1, Instead of using dd to replicate the device into the HDD and then performing the shrinking on the copied file we direcly use gparted on the device.
- Inset the disk, SD card to the PC
- Open gparted
- select the partitions, set new sizes and apply settings (same as step 5.2 above).
-
Now we perform something very simlar to step 6 of Method 1.
We type in
sudo fdisk -l /dev/sdb
This will provide statistics as previously. (as shown below)
Disk /dev/sdb: 59 GiB, 63281561600 bytes, 123596800 sectors
Units: sectors of 1 * 512 = 512 bytes
Sector size (logical/physical): 512 bytes / 512 bytes
I/O size (minimum/optimal): 512 bytes / 512 bytes
Disklabel type: dos
Disk identifier: 0xb7007318

Device     Boot  Start      End  Sectors  Size Id Type
/dev/sdb1  *      2048   526335   524288  256M  c W95 FAT32 (LBA)
/dev/sdb2       591872 14129151 13537280  6.5G 83 Linux
here we can see that /dev/sdb2 ends at sector index 13537280 (remember this is 0 indexed)
- Copy the right amount of sectors to build the backup image now we can create the image using
ddjust as we did on step 1.
sudo dd if=/dev/sdb of=/home/g/Workspace/harper_pi_clone_trimmed.img bs=512 count=$[(13537280+1)] skip=0 status=progress
After a little bit of waiting we got
6917046784 bytes (6.9 GB, 6.4 GiB) copied, 393 s, 17.6 MB/s
13537281+0 records in
13537281+0 records out
6931087872 bytes (6.9 GB, 6.5 GiB) copied, 394.797 s, 17.6 MB/s
here we copied upto the boundary of our useful space. (13537281 blocks)
- use
gnome-disksagain to restore the image.
Now we insert the empty device (usb or SD card). start gnome-disks once again and restore the newly created image from setp 5.
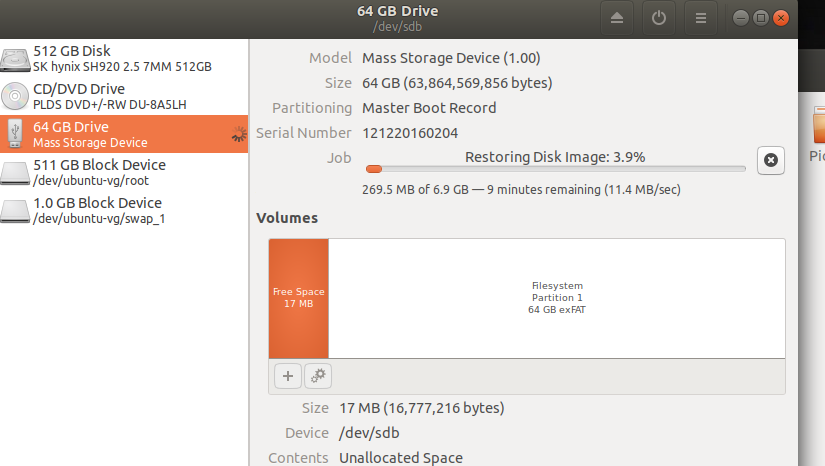
now you should have you bootable image.
Extra Hint: if you want to skip the bootable portion you can use a non-zero value for the skip parameter in dd (just skip the boot sectors)
Method 3: (untested)
I found this in a raspberry pi forum
you will need to create the disk image as before and try pyshrink to shrink the image. Then use the above methods (method 1 step 7 or method 2 step 6) above to restore the image again.
Note: I haven’t personally tested this so please do give a shout if you give it a try!